
Text Analyzer - Google Chrome Extension
Text Analyzer Extension can provide grammatical and semantic information for the selected text in English directly in Google chrome browser
Introduction
You can install the extension from Google Chrome Store
App Screenshots
The chrome extension functionality can be explained in few pictures.
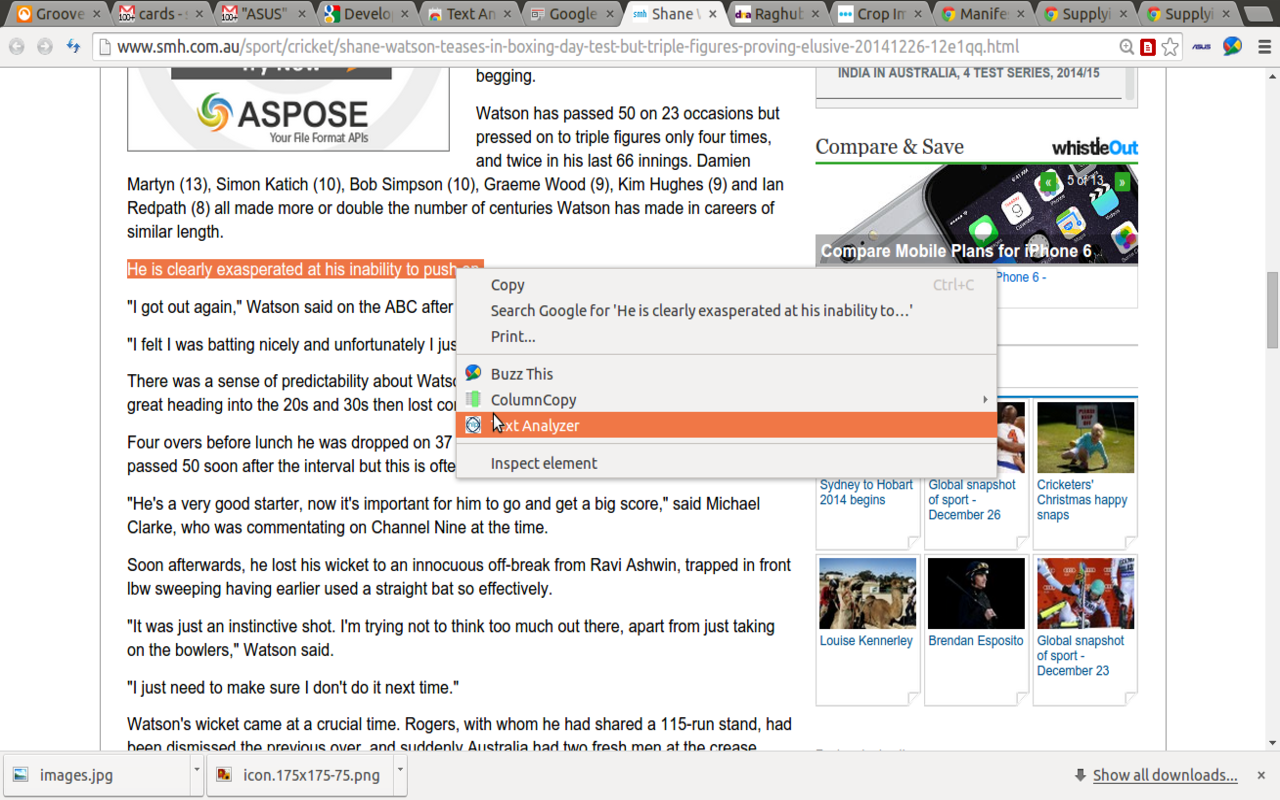
1. Right click mouse and click on TextAnalyzer
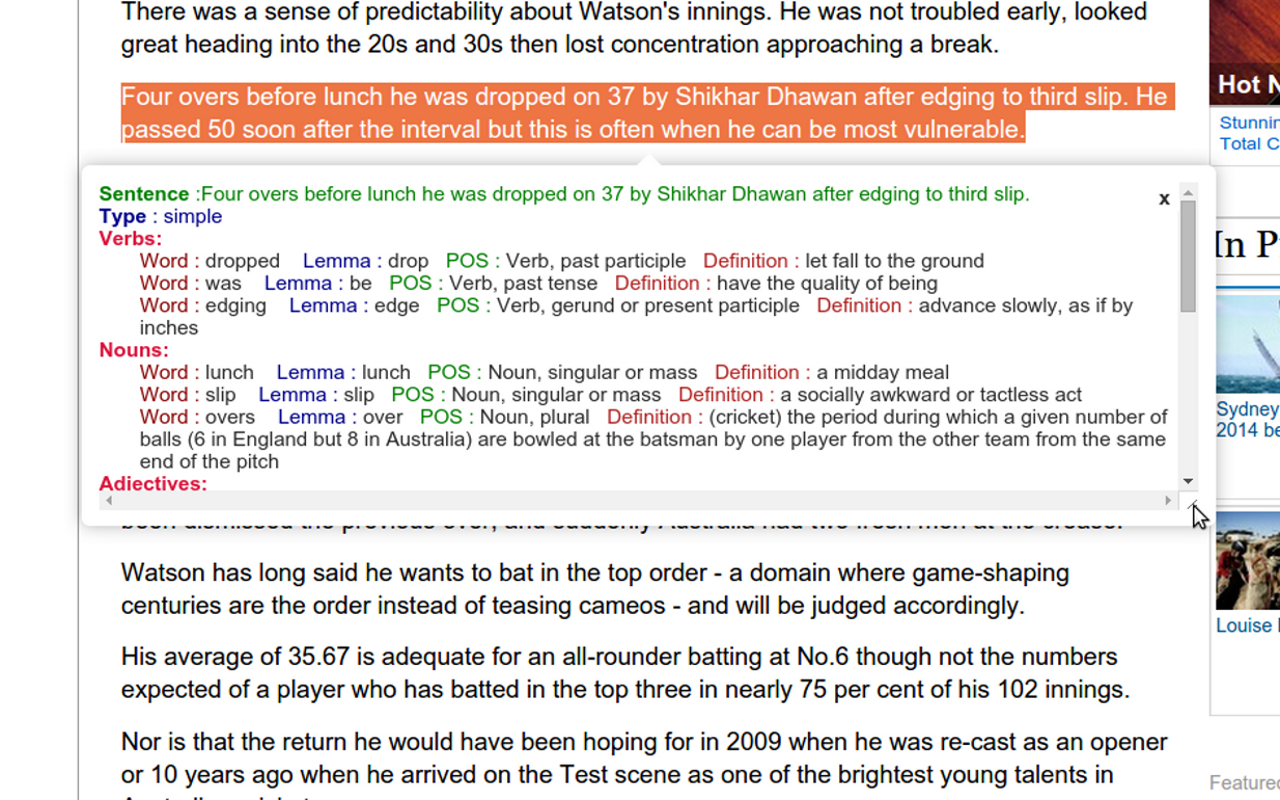
2. The results will be displayed on hover over the selected text
- While the results are being retrieved, there will be a small spinning wheel
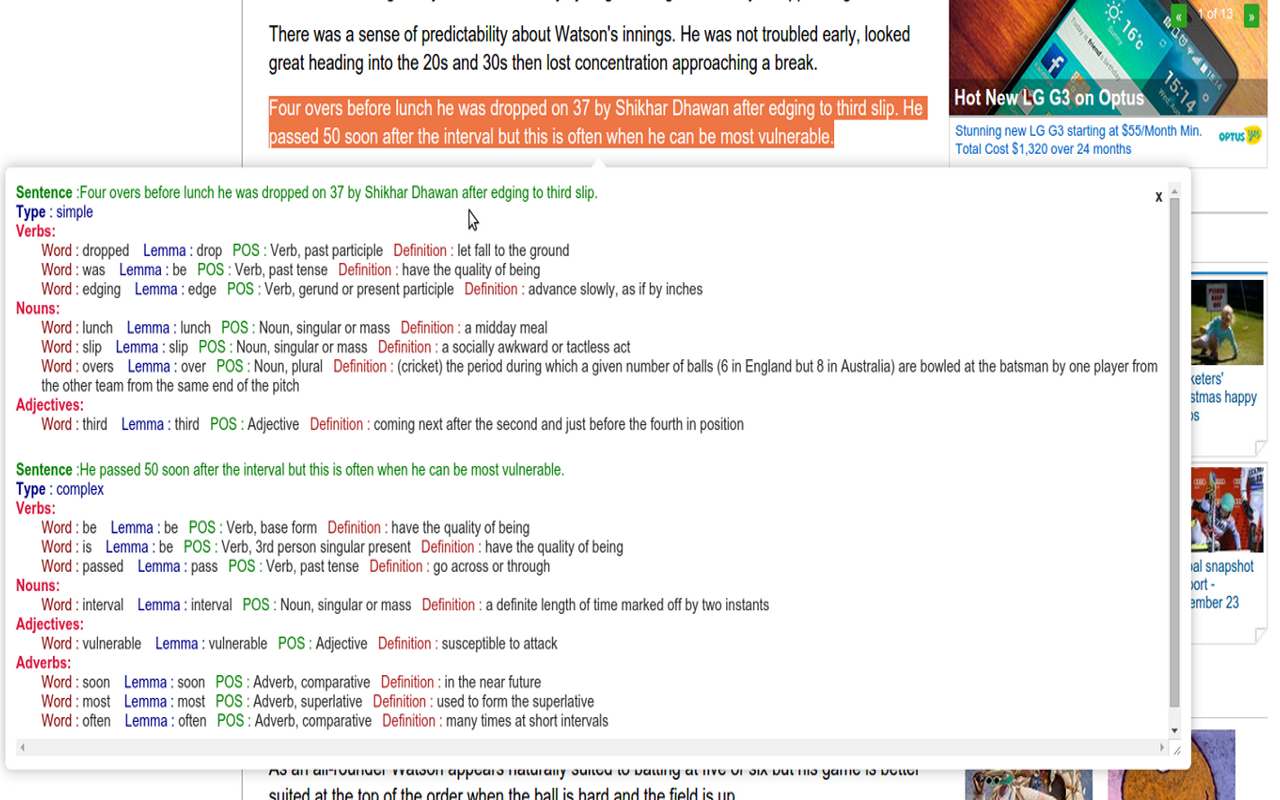
3. You can also select multiple sentences
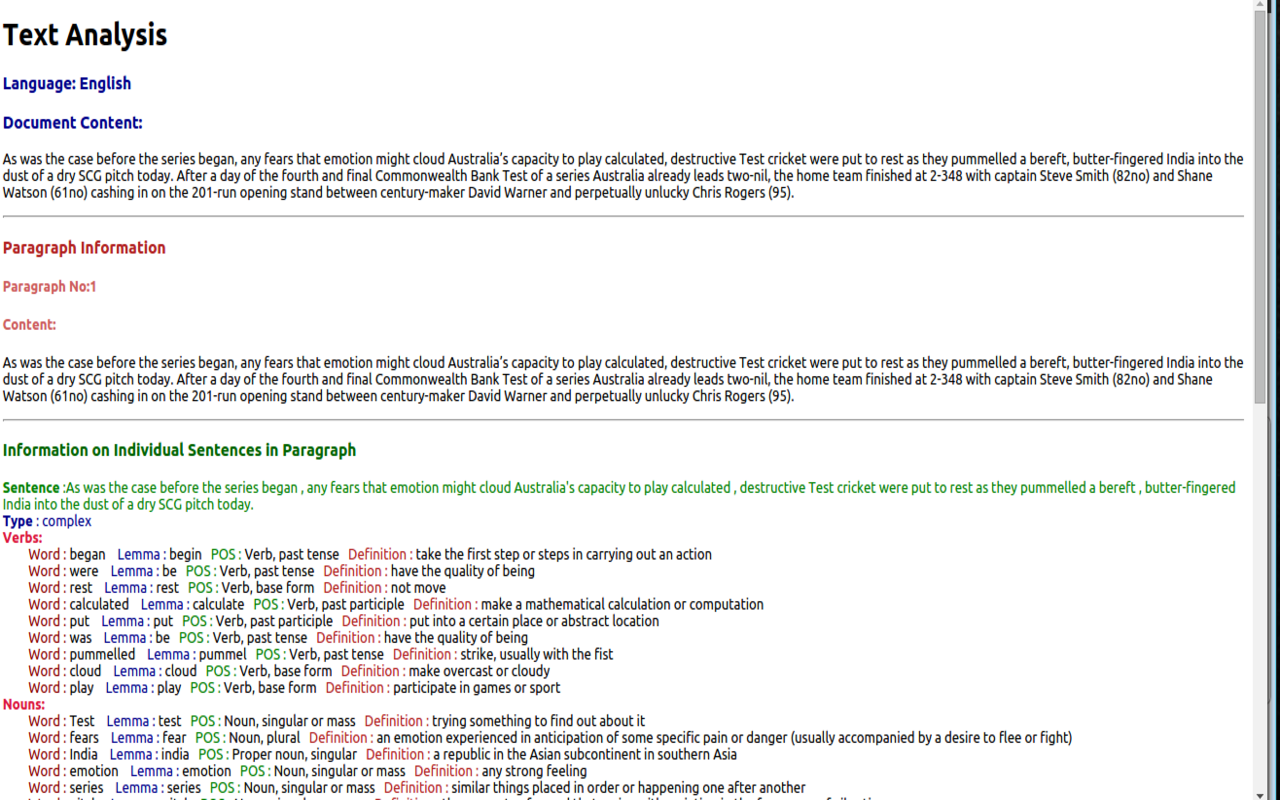
4. Click on More Information to see more details in a new tab
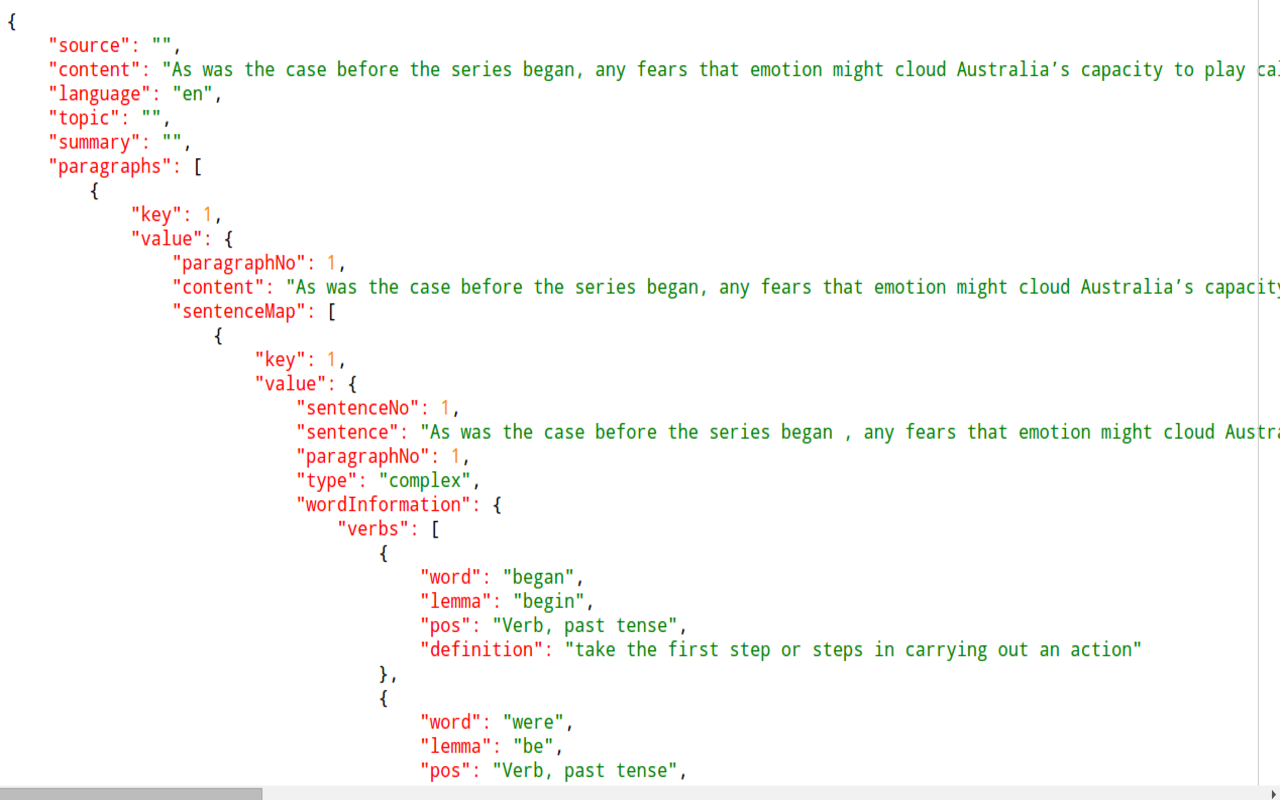
5. The output is in json format
How it can be useful?
If you are learning English grammar or interested in looking at grammar and semantics at the sentence level
How does it work?
- You can either select a sentence or more than one sentence.
- The extracted information will be displayed in an interactive tool-tip.
- User can hover over the selected text again to see the information.
- Tool-tip can be closed as well.
- Clicking on “More information” will open a new tab with more content.
- Clicking on “JSON” will show the JSON data in a new tab.
What information is provided?
Following information is provided currently:
- Sentence Type: Type of the sentence. In English, there are 5 broad grammatical types:
- Simple
- Complex
- Compound
- Compound Complex
- Fragment
- Information for following types of words is displayed:
- Nouns
- Verbs
- Adjectives
- Adverbs
- Following information is associated with each word:
- Lemma -> The root form of the word.
- Part of Speech -> The part of speech of the word, Tense, Plurality etc
- Definition -> Definition of the word as found in Wordnet 3.1
Code
The code is available at Github
Rest of this post will explain the structure of the code.
Chrome Extension
- The official documentation to make a Chrome Extension can be found here.
- It covers the basics well , however to add different functionalities requires quite a bit of survey on tutorials and stack overflow.
This post will explain implementation of some features which are part of the text analyzer extension code.
Architecture for Chrome Extension
The architecture for the chrome extension is below:
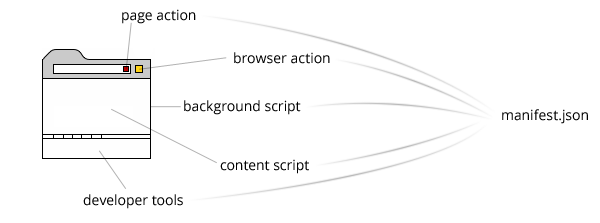
Manifest.json
The manifest.json file tells Chrome important information about your extension:
- JSON file that brings together the backgrounds, popups, content scripts and injected scripts by * specifying where they are in the file structure
- Configures the extension (e.g. permissions)
- Contains general extension related information (e.g. name, version)
Google has published a list of all the fields supported in manifest version 2
The Manifest.json for this project looks like this:
{
    "manifest_version": 2,
    "name": "Text Analyzer",
    "short_name" : "TA",
    "version": "1.3.2",
    "description": "Get Grammar and semantic Information of the selected text on a webpage.",

    "icons": { "16": "icons/icon16.png",
           "48": "icons/icon48.png",
          "128": "icons/icon128.png" },

  "web_accessible_resources": ["images/ajax-loader.gif", "ta.html"] ,

    "content_scripts": [{
        "matches": ["<all_urls>"],
        "css": ["css/lib/tooltipster.css","css/lib/tooltipster-shadow.css","css/textanalyzer.css"],
        "js": ["scripts/lib/jquery-1.11.1.min.js", "scripts/lib/jquery.tooltipster.min.js","scripts/inject.js"]
    }],

    "background": {
        "scripts": ["scripts/event.js"],
        "persistent": false
    },
    "permissions": ["tabs", "<all_urls>","contextMenus"]
}
User Interface
There are several ways to build the UI of Google chrome extension. In our case we will add context menu which be visible on right click of mouse.
Context Menus
- Context menus are a way to provide a user interface for the user to interact .
- The context menu is activated on right click which is different based on the context in which it was activated.
- The chrome.contextMenus API allows us to add menu items to the context menu for different activation contexts.
- We must declare the contextMenus permission in extension’s manifest.json.
"permissions": ["tabs", "<all_urls>","contextMenus"]
Browser Action
- Most developers use the browser_action property to build their plugins.
- Once we set it, an icon representing our extension will be placed on the right side of the address bar.
The entry in the Manifest.json looks like this:
"icons": { "16": "icons/icon16.png",
           "48": "icons/icon48.png",
          "128": "icons/icon128.png" }
Background Pages
- These are Java-script file(s) that always run in background of Chrome
- They don’t have any user interface and run in the background
- They have access to Chrome application level commands
- They also have full access to all permitted chrome.* APIs
In our case , scripts/event.js represents the background javascript file.
Some of the important function that we defined in this file are :
Inject Content Script into a tab
This function will inject the main content script scripts/inject.js into the
// Execute the inject.js in a tab and call a method,
// passing the result to a callback function.
function injectedMethod(tab, method, info, callback) {
    chrome.tabs.executeScript(tab.id, {
        file: 'inject.js'
    }, function() {
        chrome.tabs.sendMessage(tab.id, {
            method: method,
            information: info
        }, callback);
    });
}
Add Context menu on right click
This code will add context menu for Text analyzer on right click.
// Set up context menu at install time.
chrome.runtime.onInstalled.addListener(function() {
    var context = "selection";
    var title = "Text Analyzer";
    var id = chrome.contextMenus.create({
        "title": title,
        "contexts": [context],
        "id": "context" + context
    });
});

chrome.contextMenus.onClicked.addListener(onClickHandler);
Action on clicking Text Analyzer in Right click menu
This code will call the functions in scripts/inject.js with the selected text
// The onClicked callback function.
function onClickHandler(info, tab) {
    var sText = info.selectionText;
    injectedMethod(tab, 'textAnalysis', info, function(response) {
    })
};
Content Scripts:
Content scripts run in the context of web pages. They can interact with web pages that the browser vists.
"content_scripts": [{
        "matches": ["<all_urls>"],
        "css": ["css/lib/tooltipster.css","css/lib/tooltipster-shadow.css","css/textanalyzer.css"],
        "js": ["scripts/lib/jquery-1.11.1.min.js", "scripts/lib/jquery.tooltipster.min.js","scripts/inject.js"]
    }],
The main content script for us, apart from the included jquery and tooltips library is the scripts/inject.js
Main function to process the NLP text
- This javascript injects the NLP information extracted from Text Analyzer server into the current page.
- This helps avoid conflicts in case we inject this script on the same page multiple times without reloading.
var injected = injected || (function(information) {

    // An object that will contain the "methods"
    // we can use from our event script.
    var methods = {};

    // This method will eventually return
    // background colors from the current page.
    methods.textAnalysis = function(information) {
            sendRequestToTextAnalyzerServer(information);
            return "";
        }
Function to communicate with server for Information
- Create a request json to send to the NLP server. The back-end server is also created by me and hosted on digitalocean
- Post the data to the NLP server using XMLHttpRequest
- Call function to process the response from the server.
- Post alert message if the communication with server failed.
    function sendRequestToTextAnalyzerServer(information) {
        // The URL to POST our data to
        var postUrl = 'https://104.131.121.5:9000/TextAnalyzerWebService';
        var selectedElement = getSelectionBoundaryElement(false);
        var selectedText = information.selectionText;
        var language = "en";
        var module = "SentenceAnalysis";
        var uri = chrome.extension.getURL("images/ajax-loader.gif");
        var request = $.ajax({
            url: postUrl,
            type: "get", //send it through get method
            dataType: "json",
            data: {
                text: selectedText,
                language: language,
                module: module
            },
            beforeSend: function() {
                // show gif here, eg:

                $(selectedElement).css('background', 'url(' + uri + ')  no-repeat');
            },
            complete: function() {
                // hide gif here, eg:
                $(selectedElement).css('background', 'none');
            }

        });

        request.done(function(response) {
            processTextAnalyzerResponse(response, selectedElement);
        });

        request.fail(function(jqXHR, textStatus) {
            alert("Request failed: " + textStatus);
        });
    }
Process response from the Server
This is a long function which does the work of processing and displaying the response from the server.
    /**
     * This function will process the text analysis server response and render sentence information
     * @param {type} response
     * @param {type} selectedElement
     * @returns {undefined}
     */
    function processTextAnalyzerResponse(response, selectedElement) {

        var selectedText = $(selectedElement).text();


        var sentenceData = "";
        //var jsonResponse = JSON.parse(response);
        var html = "<div id='tooltipdiv' class='tooltipdiv'>";

        var wordTemplate = "";

        var paragraphs = response.paragraphs;
Iterate over all paragraphs from response and create the result string to display
- As the input text can be more than one paragraph, we need to iterate over each paragraph
- We obtain the information for each sentences and put that information into the sentence template.
 for (var i = 0; i < paragraphs.length; i++) {
            var paragraph = paragraphs[i].value;
            var sentenceMap = paragraph.sentenceMap;
            for (var sentenceIndex = 0; sentenceIndex < sentenceMap.length; sentenceIndex++) {

                var sentenceObject = sentenceMap[sentenceIndex].value;
                var sentenceType = sentenceObject.type;
                var wordInformation = sentenceObject.wordInformation;
                var string = sentenceObject.sentence;
                var verbs = wordInformation.verbs;
                var nouns = wordInformation.nouns;
                var adverbs = wordInformation.adverbs;
                var adjectives = wordInformation.adjectives;


                var sentence_template = "<span style='color:green' <font size='6'><b> Sentence</b> :" + string + "</font></span><br> ";
                sentence_template += "<span style='color:DarkBlue' <font size='5'><b> Type </b>: " + sentenceType + "</font></span><br>";

                if ((typeof verbs != 'undefined') && verbs.length > 0) {
                    sentence_template += "<span style='color:Crimson'><b>Verbs:</b> </span><br>";
                    sentence_template += "<div style='margin-left: 2em;'>";

                    for (var i = 0; i < verbs.length; i++) {
                        var verb = verbs[i];

                        wordTemplate = createWordTemplate(verb);

                        //var word_html = Mustache.to_html(wordTemplate, verb);
                        sentence_template += wordTemplate;
                    }
                    sentence_template += "</div>";
                }

                if ((typeof nouns != 'undefined') && nouns.length > 0) {
                    sentence_template += "<span style='color:Crimson'><b>Nouns:</b> </span><br>";
                    sentence_template += "<div style='margin-left: 2em;'>";

                    for (var i = 0; i < nouns.length; i++) {
                        var noun = nouns[i];
                        wordTemplate = createWordTemplate(noun);
                        sentence_template += wordTemplate;
                    }
                    sentence_template += "</div>";
                }

                if ((typeof adjectives != 'undefined') && adjectives.length > 0) {
                    sentence_template += "<span style='color:Crimson'><b>Adjectives:</b> </span><br>";
                    sentence_template += "<div style='margin-left: 2em;'>";

                    for (var i = 0; i < adjectives.length; i++) {
                        var adjective = adjectives[i];
                        wordTemplate = createWordTemplate(adjective);
                        sentence_template += wordTemplate;
                    }
                    sentence_template += "</div>";
                }

                if ((typeof adverbs != 'undefined') && adverbs.length > 0) {
                    sentence_template += "<span style='color:Crimson'><b>Adverbs:</b> </span><br>";
                    sentence_template += "<div style='margin-left: 2em;'>";

                    for (var i = 0; i < adverbs.length; i++) {
                        var adverb = adverbs[i];
                        wordTemplate = createWordTemplate(adverb);
                        sentence_template += wordTemplate;
                    }
                    sentence_template += "</div>";
                }


                sentence_template += "<hr>";
                sentenceData += sentence_template;


            }
        }
Code to display the information in tooltip
I used the tooltipster js library to display the tool-tip.
The code below creates the content to display and then uses tool-tipster Java script library to show the tool-tip
var localid = "close" + count;
var tooltipId='tooltip'+localid;
var tooltipIdCheck='#'+'tooltip'+localid;
var moreInfoID = "#" + "moreInformation";
var viewJSONID = "#" + "viewJSON";
html += "<p>";
html += "<span id='moreInformation' class='moreInformation'>More Information</span>";
html += " <span id='viewJSON' class='viewJSON'>View JSON</span>";
html += " <span class='closeTooltip' id='" + tooltipId + "'><b> x </b></span>";
html += "</p>";
html += "<hr style='color:DarkBlue' >";
html += sentenceData + "</div>";
$(selectedElement).attr("id", localid);
var id = '#' + localid;
// console.log(html);
//var jQueryObject = $.parseHTML(html);
$(id).tooltipster({
animation: 'grow',
delay: 100,
position: 'bottom',
interactive: 'true',
theme: 'tooltipster-shadow',
touchDevices: false,
//maxWidth: 900,
//multiple:true,
restoration: 'none',
contentAsHTML: true,
content: $(html)
});
Function to perform action on clicks related to tooltip
$(document).bind('click', function(e) {
            var target = $(e.target);

            if (target.is(tooltipIdCheck)) {
                e.preventDefault(); // if you want to cancel the event flow
                $(id).tooltipster().tooltipster('destroy');
                // do something
            } else if (target.is(moreInfoID)) {
                e.preventDefault(); // if you want to cancel the event flow


                chrome.extension.sendMessage({
                    method: "seeMoreInformation",
                    data: response
                });
            } else if (target.is(viewJSONID)) {
                e.preventDefault(); // if you want to cancel the event flow


                chrome.extension.sendMessage({
                    method: "viewJSONData",
                    data: response
                });
            }

        });
Leave a Comment